Saturday, December 24, 2011

Sizzle off the Snow-- FAJITAS

There's nothing like spicy hot fajita's to warm you up in this cold weather! And after a ten mile run and a long day of sledding with friends, nothing could taste better! Plus, it gives me a chance to test out my new fajita skillet, an early Christmas present from Steve's mom!


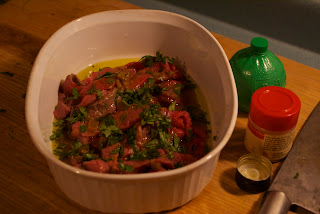
Marinading the steak:


  • 2 limes, juiced (2 tablespoons lime juice works too)
  • 5 tablespoons olive oil
  • 2 garlic cloves, roughly chopped
  • 3 tablespoon chile powder
  • 3 tablespoon fresh cilantro leaves, roughly chopped
  • 1 teaspoon ground cumin
  • 1 teaspoon salt
  • Whisk all ingredients together in a medium size bowl then sumerge steak strips in marinade. 
  • 1 pounds flank steak, trimmed of fat and cut into 4 inch strips. 
(***Flank steak is meat from the abdomen of a cow and is a relatively long and flat cut of meat- this makes it perfect for fajitas!***) 

Let the meat sit in the marinade while you slice up the vegetables. 

  • Veggies:
  • 1/2 red bell pepper, sliced into think strips
  • 1/2 yellow bell pepper, sliced into strips
  • 1/2 orange bell pepper, sliced into strips
  • (you can use what ever color of pepper appeals to you- I couldn't find any green ones at the store!) 
  • 1 large onion, sliced into rings

  • Lightly sauté the vegetables in:
  •  Lime juice + olive oil
  • On low-medium heat until soft and juice with a little brown on the edges.

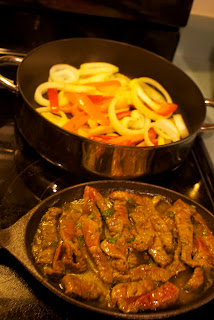
  • Once the veggies are on lay out the strips of steak onto the skillet. I get to use my new fancy fajita skillet! Pour a little marinate into the pan to cook the meat it. Medium heat will do.


 To heat up the tortillas I lay them directly over the steaming vegetable for about 20 seconds each. The microwave also works just as well- put a stack of tortillas in the microwave and nuck 'em for about 30 seconds or until warm and steaming. 


  • Lay out your tortilla and the assembling is up to the creative mind! I like top off my fajita meat and veggies with fresh avocado, salsa, and cheese! 
Happy eating! 

Monday, December 5, 2011

Chilly Chili


"Well the weather outside is frightful,
and finals aren't going to be delightful,
and since there's a lot to do... how about a big pot of chili to eat all week!" 

This morning I was greeted by fresh granulated snow that had blown in over night and deep cold 9 degree F temperature that clung to my exposed face.  Right away I knew it would be a chili night.
  

After a full day of classes, a slippery five mile run, and a back pack crammed with books and papers- it was finally time to head home to do well, more work. I stopped by the store to grab a few things for the night's super.

1can chili beans
1 can kidney beans
1 can corn 
2 can fire roasted diced tomatoes
1 pound ground beef
1small onion
spices:
1 Tablespoon steak seasoning? Found this baby in the cupboard
1 teaspoon oregano
1 teaspoon garlic powder
1 teaspoon garlic salt
1 teaspoon chili powder


I started with the small onion diced in a table spoon of olive oil, after it had a couple minutes to itself, I through in the ground beef. I mashed the ground beef up best I could with a spatula and added all the spices. After this I put in the 2 cans of diced tomatoes, the corn, and both cans of beans. It looks super watery at this point, but keeping the pot on low simmering heat and in no time it turns to thick and chunky chili. 


While the chili simmered I preheated the oven to 350 and got out my ingredients for corn bread!
3/4 cup corn meal
1.5 cups flour
1/4 cup granulated sugar
2 teaspoons baking powder
1 teaspoon salt
1 egg (beaten in a separate small bowl first)
1 cup milk
1/4 cup vegetable oil 

I combine all the dry ingredients before adding all the wet ones. Once completely mixed, no clumps, I poured it into an 8x8 square oiled pan to bake for 20 min.


I put the corn bread into the oven once the chili had been on for 40 min. Once the hour was up the chili and  corn bread where both complete and ready for consumption! 


Happy Finals Week!


Saturday, October 29, 2011

Personalizing Your Eggs

Eggs: My breakfast just about every morning includes some sort of "egg dish." My roommate Allie would always call them "scramblers," my father would refer to them as "non-boring eggs," but regardless of the name, to me they're the protein that gets my day going!


One might think that eggs every morning would get  dull and repetitive. But I like to keep things fun and constantly changing. I love to try new things in my eggs- spices, herbs, cheeses, yogurts, veggies, anything I can think of!
The next four egg dishes are some of my favorite. I have not included measurements of ingredient in every dish due the fact everyone wants their eggs a different way. Eggs can become very personal. However I hope that these dishes can inspire creativity!   


1. Creamy Citrus Salmon
I'm not sure if it's the dill, or the cream cheese or the salmon in these eggs, but the flavor is powerful and savory! I whisk the eggs in a small bowl, then mix in the remaining ingredients before pouring into a lightly greased skillet.
Amounts of each ingredient is a personal preference. 
Capers 
Salmon (canned salmon makes these eggs super easy)
Cream cheese, cut into cubes 
Lemon juice (1 tablespoon for 2 eggs) 
Dill, or any herb readily on hand


2. Sundried tomato, basil and parmesan:
More often than not I make these eggs with only dried basil leaves and parmesan- things I usually have on hand. But today I went a little more fancy
2 eggs
small handful of fresh basil leaves chopped up
4 sundried tomatoes (in oil)   
1/8 cup shredded parmesan cheese 


3. Veg out
These are the my "every day eggs," meaning that when I wake up in the morning and get out the cartoon of eggs, I also hunt for what ever spear vegetable are lurking the fridge.
When I find the veggies I want, I sauté them until they are soft in a little olive oil before pouring in my whisked eggs.
Vegetable I often seek out:
Yellow squash
Zuchine
Mushrooms
Red onion
Spinach
Tomatos


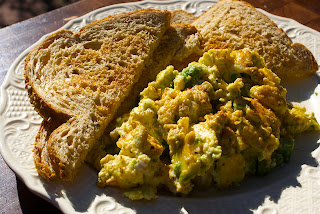
4. Spicy Greek-yogurt and Avocado
These eggs started out as an experiment, and then turned into something I really enjoyed. It took me a bit of time to fit it all together, but eventually here's what it came down to:
2 eggs
¼ cup greek yogurt
1 small avocado cubed
1 tablespoon paprika
salt to taste


Monday, August 1, 2011

Ribs and Roommates

December, 2008- It was the Footlocker National meet. High schoolers from all over the country were in San Diego, California to race each other. 10 from the West, 10 from the South, 10 from the Midwest, and 10 from the NorthEast. To make even more "friends," racers were paired up with someone from a different region of the country.  I walked into my hotel room that December afternoon, two days before the race, to meet the girl I'd share a room with for the long weekend. She was my age, a senior in high school, from Colorado Springs. Her name was Allie McLaughlin.
Little did either of us know that in a years time we'd both be buffalos running for the University of Colorado. Allie has become not only by teammate, but my current roommate and good friend in college; and tonight she has taught me how to make ribs!


We started with a dry rub on our full rack of baby back ribs:

1 clove garlic finely chopped
1 tablespoon dark brown sugar
1/4 teaspoon sea salt
1/4 teaspoon cayenne pepper
1/2 teaspoon chili powder
a dash of black pepper

(All mixed together in a small bowl)


From there the rub was... well, rubbed on...


We let the ribs sit out for 10 minutes after it's little "massage." Just to let all the flavors sink in.

Fire up the grill! It's time to throw them on!
We wrapped the ribs fully in aluminum foil before closing the grill.

Allie's creativity lead to placing a rock under the ribs when they were in smily face position, to cook them more evenly. 10 minutes for the upper left lip, 10 minutes for the bottom (no rock), and 10 minutes for the upper right lip. Then the ribs were flipped into frowny face position for a final 10 minutes on the grill.

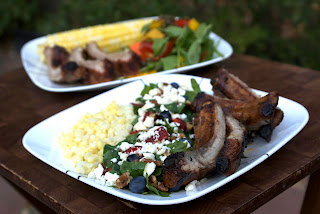
We pulled off the shinny silver blanket and delicious ribs were revealed!


Bon appetite my friends! And remember you never know the days that you're going to meet your good friends! (who might just share delicious recipes with you :)

Sunday, July 17, 2011

Taste the Rainbow!


A colorful plate is probably a healthy plate. This is my rule of thumb most nights at dinner. I try not to get stuck into a "brown meat/ white bread" color scheme. Having a variety of colors to choose from on your plate is the easiest way not to miss out on any of the major food.


Dinner last night: Shish-kabobs and corn! Colorful, easy and delicious!  
Now go eat a rainbow! 


Friday, July 15, 2011

Whole Wheat Spaghetti with Pesto and Citrus Corn Salad

Whole wheat pasta verse the regular stuff. Every once and awhile I choose the "healthier" whole wheat pasta. Whole wheat pasta is less processed and contains less glucose (lower glycemic index) therefore making it a bit of a healthier choice. Enough with the science junk- I'll be honest, I like that regular processed stuff I grew up on. My rule of thumb- enjoy what you're eating! So use regular if that's what your buds are craving! However it just so happened that whole-wheat pasta was on sale (and cheaper) at my local market- thus my choosing it.

Pesto! I learned how to make homemade pesto from my green thumb mother. In our back yard garden, I'd be sent down to the basil patch to pick as much fresh basil as possible.
From the repetition of this exercise,  I subconsciously memorized this simple recipe.

2 cups packed fresh basil leaves
  • 2 cloves garlic
  • 1/4 cup pine nuts (normally my back pocket chooses the inexpensive walnuts, but I splurged today)
  • 2/3 cup extra-virgin olive oil, divided
  • 1/2 cup grated parmesan cheese
  • salt and black pepper, to taste (tasting is the most fun part)
I grew up with a food processor in the kitchen, however in college, there are no such luxuries. Luckily my roommate owns a baby blender. I made do with that.
Simply putting all the ingredients into the blender worked just fine- as long as the olive oil goes in first.
Once everything was all blended to perfection, the salt and pepper was mixed in. Only thing left to do was wait for the pasta to boil.
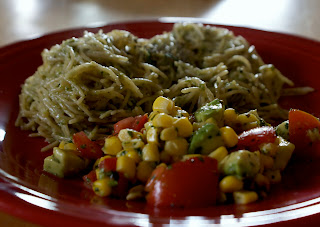
In the mean time a side citrus corn salad was thrown together.  

  • 2 avocados, cut into cubes (or the closest shape to that) 
  • 1 can of corn
  • 3 medium tomatoes, diced
  • 2 tablespoons lemon juice
  • 1 teaspoon salt
  • 1/8 cup dried cilantro

 All ingredients were thrown into a large bowl and gently mixed together.  
It feels a little incomplete to give only one sentence of instructions for a recipe, but I like simple stuff, and it doesn't get much easier than this. 


My second favorite part of this meal is it makes fantastic leftovers (cold)!
Especially when you have it for lunch in the middle of the flooded creek path. (Yep hasn't stopped raining since the Linguine and Clams!) 


Thursday, July 7, 2011

Happy Fourth of July!

Never lock your brain into recipe mode. I reserve the right to change any of my recipe on a moments notice! And that includes adding food coloring to waffle batter to make patriotic flag waffles with my roommates for the Fourth of July!
I topped my flag of with vanilla yogurt and coconut
to make white stripes! (runner's syrup)


All we did was simple designate three bowls of waffle batter to the colors red, white (plain) and blue. Then we poured into the appropriate  places on the waffle press. And vuala, the American flag!